I actually have several draft posts to catch up on I just wanted to get this one about our all summer plus project first.
So this is what we've been doing over the past 6 months now!!
OUR PROPERTY AND HOUSE RENOVATION - Welcome to Phase 1
After literally years of planning Stacy and I decided to start with the inside out renovation of the Idaho home and our property.
When we had moved here, full time, in 2006, that first year was getting the place livable and was mostly completed with the idea of 'good enough' for right now, but later we had wanted it finished. The years passed and became a decade, and the 'temporary' kitchen had become the kitchen, the living room and other rooms had become stuck in time with all the issues of not being "finished."
Mainly because over the years when we'd talk about starting any projects, Stacy's father would get upset that we would 'change' his vision, and he even took pride in the fact that in his mind the place would forever be a "work in progress" never to be finished. Think the Winchester Mystery House in California.
Now that Stacy's father was living safely in the areas assisted living facility since last January, we agreed that now, eleven years later, was the time to get going with this and get it done!
Before Photos:


It was a whole lot of work, getting the wall carefully taken down. None of that "demo day" stuff they like to show on HGTV shows where you take a sledgehammer to everything. No, we knew we'd need some of the tongue and groove wood used for the walls in other parts of the house so we took everything apart as carefully as we could.
Then the job was to take out all, and I mean all, of the parquet wood flooring as we were going to be re-flooring the now 'great room.' That was a lot of work!
After the wall was mostly down and the old flooring mainly was taken up, it was the project of redoing the pad area the wood stove sits on.


Since we had decided to move the sink from the wall to the island, we needed to run water and drainage to the island, and we decided we will be redoing the entire water system with PEX tubing and connections taking out the PVC jungle gym of water piping in the lower room.
Below: this photo shows the new kitchen drain and the new water lines. The branches go to the washing machine and the complex looking hot water connection is for the sink and the dishwasher.
With this project, I am a convert to PEX tubing!!! So much easier to use than PVC. Not shown is the amount of PVC removed for this much more straightforward installation and soon all water lines in the house will be replaced with PEX.


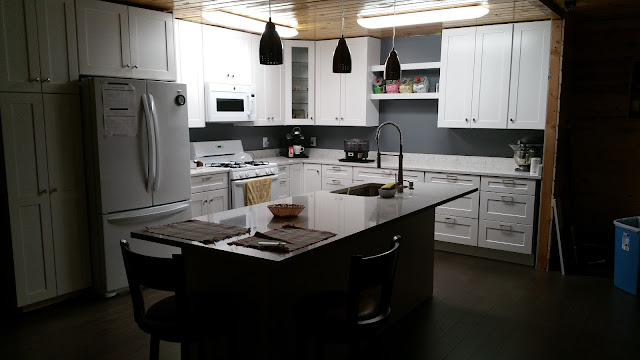
So, the last photos are a few weeks later now, and we have a functional and usable kitchen and are very happy with the outcome so far. We have more storage than any kitchen in any house we've ever lived in.
We still aren't entirely done yet with trim work still to complete in the overall room but it is so nice, and we agree a very worthwhile change to the home. Taking two smallish rooms and making a great room has been the single best idea we've had for the place.
Below: This GE dishwasher, at it's home next to the big stainless steel sink, is honestly the quietest dishwasher we've ever owned and it has the third rack on top for silverware. All stainless steel inside and easy to keep clean and so many easy to clean filters to help keep the dishes clean too. But the main thing to us is that the unit is so quiet!! Only a very subdued gear like whine sound when it's running.


So this is what we've been doing over the past 6 months now!!
OUR PROPERTY AND HOUSE RENOVATION - Welcome to Phase 1
After literally years of planning Stacy and I decided to start with the inside out renovation of the Idaho home and our property.
When we had moved here, full time, in 2006, that first year was getting the place livable and was mostly completed with the idea of 'good enough' for right now, but later we had wanted it finished. The years passed and became a decade, and the 'temporary' kitchen had become the kitchen, the living room and other rooms had become stuck in time with all the issues of not being "finished."
Mainly because over the years when we'd talk about starting any projects, Stacy's father would get upset that we would 'change' his vision, and he even took pride in the fact that in his mind the place would forever be a "work in progress" never to be finished. Think the Winchester Mystery House in California.
Now that Stacy's father was living safely in the areas assisted living facility since last January, we agreed that now, eleven years later, was the time to get going with this and get it done!
Before Photos:

Above: A portion of the 'temporary that became permanent - kitchen' and the small doorway with the wall that separated the living room and kitchen areas. It had been like this for a long time.
Below: The living room as it was, sixteen feet wide by twenty-four feet deep.

OK, so you get the idea.
There was a whole lotta wood going on in this place!
So, on President's Day, February 20th, 2017, we took all of our kitchen ideas and met with a "kitchen designer" from our area Home Depot. We changed a couple of our thoughts and hers too in talking with her, and we had to admit she had come up with a few good ideas also, especially with us just describing things to her as we'd taken no photos with us for her to go by.
She entered all we'd agreed upon into her computer program and, Bam!
We had a new kitchen looking back at us on the printed pages!
We really liked the design and were anxious to get started, even with several feet of snow on the ground from our record snowfall just days before.
I had talked with Stacy about waiting a little while longer, with all the snow and cold of winter.
But we decided we'd start with as much as we could with keeping the house closed from the cold.
So, we thought that the best first step was removing a wall!


Then the job was to take out all, and I mean all, of the parquet wood flooring as we were going to be re-flooring the now 'great room.' That was a lot of work!
After the wall was mostly down and the old flooring mainly was taken up, it was the project of redoing the pad area the wood stove sits on.

Above: The wood stove had been sitting on ceramic tiles in an angular shape you can see the ghost of in the photo. The weight of the wood stove had broken several of the ceramic tiles, and in Stacy's redesigned pad there would be much better support, but it took a couple of days to get the old tiles and cement backing Stacy's father had applied directly onto the flooring base instead of a cement backer board and then to the floor.
Below: We did it though! This photo shows the material we'd used to get the flooring all level after the few areas where taking out the cement took out chunks of wood to.

Below: The new wood stove pad, with thick Italian tiles looking like bricks on a more sturdy cement backing board for the wood stove. Not grouted yet in this photo, but you get the idea, and Stacy did an excellent job considering it was the first time doing something like this pad.

Then it was on to the next job! Moving a door!
We didn't like the placement of the door to the bedroom off the living room, so we took out the door closed that door opening up and made a new door midway in the room.
Below: The door goes here! We cut a rough opening then went to work framing the interior wall for a door opening by removing the studs in the way of the door.


Above: The area being framed for the door opening but not done yet in this photo. All the blue tape is marking the studs so when we rebuilt the wall with tongue and grove from the other wall taken down, it would be faster going with the nail gun.

Above: Stacy using our best purchase for the project, the Bosch, Horizontal and Verticle Lazer level, to mark the mount for the sliding barn door we decided to use over a traditional swinging door.

Above: The mounted but not yet stained door at the new door location where the door used to be in the corner behind the covered TV.
Below: New paint and some new parts bring new life into our wood stove now in its place on the pad.


Above: The sliding door stained and up.
Below: Now we started the longest part, the new floor, wall to wall.


First thing was securing the floor better to the joists as when being built Stacy's father, since he was working alone, didn't hit the joist with the nails from the nail gun which over the years created a lot of squeaking and creaking areas on the floor.
It is all fixed now though!
We used screws instead of nails this go around which we felt was a more secure flooring attachment. The floors all stiff, we put down a base layer of cork for some cushion as well as insolation for the new flooring.

Above: A view of the cork underlayment for the new flooring.
With all the construction going on it was time for new outlets in the kitchen before the drywall could be put up. Again, in the temporary that became the permanent kitchen, there had only been two outlets and we knew that was not nearly enough. So below, are the photos of some of that process.

Above: a former switch became a junction box for eight new counter outlets.
Below: At this corner the new outlets and wiring all in place.


Above: Although we have NO PLANS to ever do this again! I wanted to try to make it a bit easier for the next person by labeling everything I could as far as which circuit breaker they are connected to and in this case on this junction, which way the line goes to the other outlets. Even the wires got labeled as the one on the right.

Above: The wooden walls in the kitchen gone and now the drywall up and almost ready to be primed, another step is done on the road to rebuilding.
When we'd started, in February, we were hoping for the slim chance we could be almost done, cabinets and countertops installed, before June when our daughter and grandkids would be there for our early summer trip.
Then, in May, when we had been expecting our cabinets to be done and getting a call for them to be delivered, we found out that our designer had royally dropped the ball by not calling and ordering the cabinets to be built in early April as has been planned. She had not made the call until almost May which pushed back the cabinets completion to late June due to increased demand for the spring and summer projects by now in full swing.

While in the middle of nowhere eastern Montana, on our 'Dinosaur Trail' adventure we finally got the call that the cabinets were finished and ready to be delivered!
Of course, we knew that would happen since by then the completed date was to be mid to late June and even then it was the end of June. We arranged to have them delivered on July third, and they were as you can see in the photo above with many of the boxes in the living room/kitchen area, but they go from wall to wall, to get acclimated before we start the actual installation.

Above: We started at the corner with the upper cabinets as we had seen and read was the best way to start. These cabinets were H-E-A-V-Y and were in no way as easy to hold up and install as pretty much everything we'd seen, on HGTV AND YouTube, but with no injuries or hernias, we got the upper cabinets installed enough to start on the long run of the lower cabinets as seen next.
Below: What we were doing here is getting the base cabinets connected as one big unit for the install. We had seen and purchased a product called "E-Z Levels" after seeing the product and its use on YouTube. They work pretty much as shown and promised in the company videos and even though they were NOT inexpensive, they turned out to be a very worthwhile purchase for our project, and we would readily recommend them and use them again if we were doing another similar project.
The E-Z Level allows height, and level adjustments from the front of the cabinets and a perfect level can be achieved! Even with things like cabinets that are in no way built level, even these expensive Thomasville cabinets!

Below: Stacy fine-tuning the entire 135-inch long cabinet wall-run using the E-Z Levels and our laser level line. It took some time, as we found out early on, nothing ever goes as fast and easy as on HGTV!

Since we had decided to move the sink from the wall to the island, we needed to run water and drainage to the island, and we decided we will be redoing the entire water system with PEX tubing and connections taking out the PVC jungle gym of water piping in the lower room.
Below: this photo shows the new kitchen drain and the new water lines. The branches go to the washing machine and the complex looking hot water connection is for the sink and the dishwasher.
With this project, I am a convert to PEX tubing!!! So much easier to use than PVC. Not shown is the amount of PVC removed for this much more straightforward installation and soon all water lines in the house will be replaced with PEX.


Above: The brand new dishwasher we'd bought for the third rack and supposed quietness as we were getting it ready to be set up in the space on the island right where I was standing.
Below: Stacy putting in the LED bulbs in the three over the island lights.

Below: August 28th and the counters get installed! We almost have a kitchen again!

The installers were pretty good at what they did and quick to having everything done in just under two hours from getting there to leaving. Between themselves, they would speak, English, Russian and Italian so we couldn't understand what they were saying. I always imagine it to be like so many comedies where they say disparaging things about you and you, wouldn't know it.

Above: This is a photo of five hundred dollars worth of metal to hold up the one-foot extensions of the island countertop.
Below: After the installers had left and before we started to go to work ourselves, Stacy checking out the job. We were thrilled!

So, the last photos are a few weeks later now, and we have a functional and usable kitchen and are very happy with the outcome so far. We have more storage than any kitchen in any house we've ever lived in.
We still aren't entirely done yet with trim work still to complete in the overall room but it is so nice, and we agree a very worthwhile change to the home. Taking two smallish rooms and making a great room has been the single best idea we've had for the place.
Below: This GE dishwasher, at it's home next to the big stainless steel sink, is honestly the quietest dishwasher we've ever owned and it has the third rack on top for silverware. All stainless steel inside and easy to keep clean and so many easy to clean filters to help keep the dishes clean too. But the main thing to us is that the unit is so quiet!! Only a very subdued gear like whine sound when it's running.

Below: In use now, all the knobs and pulls installed on all the cabinets and drawers, even with a really nice dining table Stacy and I use the end of the island for most meals at home now. Yes, we love it!


Above: this is a photo including the new convection/microwave oven we bought and installed. I had to install a venting system too as we'd never had a vent in the kitchen area before, up through the cabinet above the unit and out to the roofline, so there was a lot of work involved with the installation of this one thing. Later we will be upgrading the stove but the old one still works pretty well. All I can say is, if your kitchen has a vent, USE IT!! The mess from years of unvented cooking in a small kitchen is not an easy cleanup, we found that out taking everything out for this renovation.
So, this is in brief, if you can believe it, of what we did almost all summer long.
Yes, we had a 2-week break for our Dinosaur Trail Part -2 summer trip and we had work-related trips over the summer, and our department even had to be moved in July, so it was a very, very busy summer during the hottest and dryest season in many years for the area.
But pretty much many evenings after work and every weekend was spent getting this project completed. We had to get it done, no one else was going to be getting it done for us! No crew!
We were the crew.
No drone flying, the smoke was too thick anyway most of the summer and I never even started the Solstice since there wasn't any real free time!
WE had to get this project done.
And yes, Stacy and I do have a sense of pride in our work because so many people say "I did this" or "we did that project" only to see or know that they paid to have it done, for them.
Stacy and I, we DID everything but the countertops, on this project and are still doing whatever in this project has to be done next.
Now, should Stacy get those six magic numbers? Oh yeah, we would love to help out our local economy and have this done for us!
Other things we've learned over the months,
1. We will not be house 'flippers'!
2. We don't want to be plumbers or electricians!
3. We also do not want to be installers, movers, or anything like that!
It is great we have learned how to do many of these things, or learned how to do them better, but should we ever move? It will have to be turn key and move in ready!!
But now here we are in the early fall and while this part is almost done we still have a next "phase" on tap and that is bedrooms! Next summer? It will be outside projects.
But nothing else we are planning to do should be of the magnitude of this first and most expensive part of our renovation.
Comments